
Walkout push-ups are a powerful bodyweight movement that combines strength, mobility, flexibility and core stability in one smooth flow. Whether you’re a beginner looking to build upper body strength or an advanced athlete aiming to improve functional fitness, this dynamic compound movement deserves a place in your workout routine.
In this comprehensive guide, we’ll explore the benefits, proper form, variations, and structured push-up workouts. Plus, you’ll find tips on how to progress, avoid injury, and get the most out of every rep.
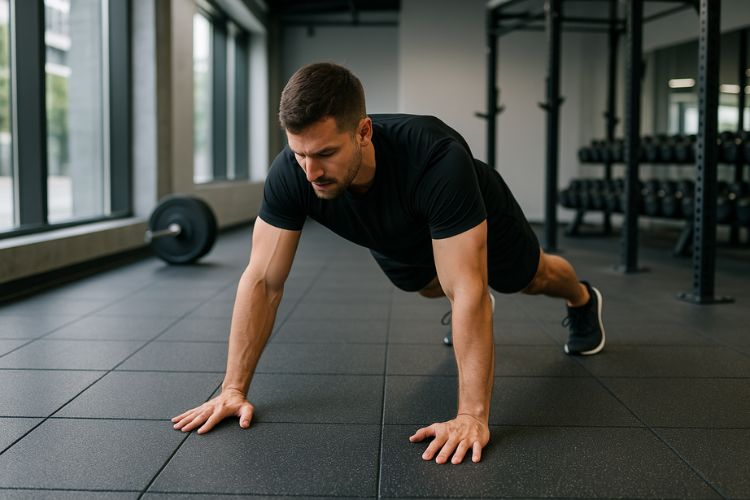
Walkout Push Up A guide to core strength and stability
Walkout push-ups are a hybrid bodyweight exercise that starts with a forward bend and ends in a push-up position. You bring your hands out of the standing position into a plank, perform a push-up, and then return them to the standing position. This move tests your coordination, activates your core, and strengthens your upper and lower body.
Benefits of Walkout Push Ups
Builds strength throughout the body
Walkout push-ups activate many muscle groups including chest, shoulders, triceps, core, hamstrings and glutes. It’s a perfect bodyweight exercise for building muscular endurance and upper body strength without equipment.
Improves flexibility and mobility
The movement encourages hamstring and back flexibility as you bend and extend through a full range of motion. This makes it ideal for warming up or cooling down while working on mobility.
Strengthens core stability
As you put your hands out and hold a plank, you the core muscles are stabilized your spine. This strengthens your abs, obliques and lower back – critical for posture and athletic performance.
It enhances cardiovascular endurance
Performing multiple push-ups increases your heart rate and burns calories. It becomes a functional cardio training when done at high volume.
Functional Movement
This exercise mimics real-life movement patterns such as bending over and supporting your body with your arms, making it highly functional and transferable to everyday activities.
The Muscles Worked During Walkout Push-Ups
- pectoralis major (chest)
- Deltoids (shoulders)
- Triceps Brachii (The Arms)
- Rectus abdominis (Abs)
- Slopes
- Erector Spinae (Lower Back)
- Hamstrings
- Buttocks
How to Properly Perform the Push-Up Walkout
Step by step instructions
- Start standing tall: Feet shoulder width apart, hands at sides.
- Bend your hips: Bend forward at the waist and place your hands on the floor.
- Walk out: Walk your arms forward until you reach a strong high plank position with your wrists under your shoulders.
- Perform a Push-Up: Lower your chest toward the floor keeping your elbows close to your body. Press back up.
- Walk back: Walk your hands back to your feet and return to a standing position.
Tips for proper form
- Keep yours involved nucleus to prevent the hips from sagging.
- Don’t rush – focus control and range of motion.
- Keep neutral spinal alignment everywhere.
- Keep the knees slightly bent if your hamstrings are tight.
Push-Up Walkout Variations
1. Knee Walking Push-Up (Beginner Friendly)
Start from your knees instead of your toes during the push-up phase to reduce tension.
2. Walking on the shoulder tap
Add two shoulder taps after reaching the plank to build core stability and shoulder strength.
3. Walkout with Dumbbell Row
Once you’re in plank, perform a row with dumbbells on each side before walking back — great for your back and arms.
4. Plyometric Walkout Push-Up
Add a clap or an explosive push-up at the bottom to increase the power and impact of your cardio.
5. Downward Dog Walk
Instead of returning to a standing position, switch to downward dog for added stretch and mobility.
6. Walking Push-up Hold
Pause at the bottom of the push-up for 3-5 seconds to increase time under tension and increase strength.
Sample Walkout Push Workout Routines
H2: Push-Up Workout for Beginners (No Equipment)
Ideal for bodyweight beginners looking to build strength and confidence.
Circuit – Repeat 3 rounds:
- 10 Walkout Push-Ups (knee version)
- 10 glute bridges
- 20 standing marches
- 30 second plank hold
- 30 seconds rest between rounds
H2: Intermediate full-body push training
Challenge your endurance, strength and core with this calorie-burning routine.
AMRAP (As Many Laps in 15 Minutes):
H2: Advanced Walkout Push-Up HIIT routine
Push your limits with this high-intensity interval training that uses the legs for strength and metabolic conditioning.
Complete 4 rounds:
- 40 seconds: WPU on shoulders
- 20 seconds: Jump Squats
- 40 seconds: Dumbbell Row Walkout
- 20 seconds: High knees
- 40 seconds: Plyometric Push-Up Walkouts
- 20 seconds: Balance
Repeat the full circuit 4 times with 60 seconds of rest between rounds.
Push-Ups Walkout in a warm-up routine
Because they activate your upper and lower body while mobilizing your joints, WPUs are great for warming up.
Dynamic warm-up example:
- 10 arm circles (each direction)
- 10 Leg swings
- 5 Walkout Push-Ups
- 20 Jumping Jacks
- 5 Bodyweight Squats
This sequence increases circulation, enhances joint lubrication, and prepares your muscles for heavier lifts or cardio.
Tips for getting ahead with Walkout Push-Ups
Increase the repetitions gradually
Start with 3 sets of 5-8 reps. Gradually add reps each week.
Add Resistance
Use a weighted vest or resistance band around your back for added challenge.
Slow down the movement
Pause at various phases: halfway through, at the bottom of the push-up, or in plank position for more core work.
Combine with Supersets
Combine with complementary moves like pull-ups, dumbbell rows or lunges for a full-body superset.
Common mistakes to avoid
Letting the hips drop
Avoid collapsing your hips in the plank position—this stresses your lower back. Engage your core!
Rushing Through Reps
Too fast movement compromises the form. Controlled movement provides better strength and mobility results.
Poor Push-Up Form
Make sure your elbows don’t flare out too much. Pull them in slightly to protect your shoulders.
Limited range of motion
Fully stretch and contract your muscles – half reps limit your gains.
Who Should Do Walkout Push-Ups?
WPUs are safe and beneficial for almost any fitness level. They are ideal for:
- beginners: Building core strength and mobility.
- Busy professionals: A quick, efficient move to take anywhere.
- Athletes: Functional strength training for performance.
- Elderly people: With modifications, supports joint flexibility and core stability.
- Travelers: No gym? No problem — this move only requires floor space.
Incorporate Walkout Push-Ups into your workout routine
Example of a 3-day weekly schedule:
Monday – Strength
- Incline Push-Ups – 3×10
- Walkout Push-Ups – 3×10
- Dumbbell Rows – 3×12
- Squats – 3×15
Wednesday – Core & Cardio
- Push-Ups to Walkout Plank – 4×10
- Jumping Jacks – 3×20
- Climbers – 3×30 seconds
- Plank – 3×30 seconds
Friday – Full Body Blast
- Walkout Push-Ups – 4×12
- Lunges – 3×12 each leg
- Burpees – 3×10
- Russian Twists – 3×15
Recovery and stretching after a push
Don’t skip the recovery! The WPU involves many muscles and joints, so finish with appropriate stretches.
Post-workout stretching suggestions:
- Child’s pose
- Downward dog
- Chest opener on the wall
- Hamstring stretch
- Shoulder stretch across the chest
Stretching improves flexibility, reduces pain and aids in muscle recovery.
Why Walkout Push Up workouts belong in your routine
Walkout push-ups are more than just a fancy variation of the classic push-up. They mix strength training, flexibility work, basic preparationand functional movement in a simple but powerful exercise.
Whether you’re looking for an effective warm-up, a full-body workout, or a portable, travel-friendly move, the WPU ticks all the boxes. Add them to your weekly routine, combine them with other bodyweight exercises or dumbbell exercises, and scale them to match your fitness level.
Your body will thank you with improved mobility, better posture, and increased strength from head to toe.