
Wendy Ouriel
I spent 4 years in the basement of my university working in an electron microscopy lab. And even though there were 30,000 students at the university, I was pretty much working alone down there.
During my time earning my degree I learned about biological growth of all kinds which led to my research in antiaging biology and eventually skin care biology. But my research on black widow spiders required me to become proficient in electron microscopy techniques and histology, which are slowly fading into the ether of classical research techniques and slowly becoming lost knowledge.
Once at the forefront of scientific innovation, electron microscopy was what allowed us to first visualize the internals of the cell and gave us the initial knowledge upon which all future cell research was based.
And despite the fact that this is the best technique we have for visualizing the interior of the cell, it is becoming an abandoned science. Why; Because it takes a lot of effort and a lot of time to get a result and modern scientists want to put less effort into research and get an instant result.
Electron microscopy isn’t just about looking at a specimen under the electron microscope, it’s also the weeks of preparation to get your specimen ready for viewing under the field. Here was the protocol I used for my spiders:
1. An important aspect of my research required me to determine exactly where the eggs were located on the spider’s body while it was in the process of laying eggs. We didn’t know how the eggs went from floating in the abdomen inside the oviduct (system of tubes where the eggs go) to outside the body. So if you are able to get a sample taken at the time of spawning, you can see where the eggs are in the body at that point.
But the problem is that spiders don’t give much warning when they are ready to lay eggs, so I had to sit in a spider grow chamber for hours a day, many days a week to wait for her to start laying eggs. When this happened I would have about 5 minutes to play. So I would take the spider (which was in a large petri dish style habitat), run down the hall to our other lab, take the spider out of the dish and put it in a CO2 chamber. I would turn on the CO2, which would render the spider unconscious, and then cut off its head.
2. Once you have the specimen you need for your research, you should then begin the histological techniques required to prepare it for viewing under the microscope. You can’t just take a sample and put it under the scope, you have to go through a long and arduous process first. The first thing you need to do is prevent your specimen from decaying now that it is dead. So you have to fix it. The mounting step is the most important step because if you don’t mount your web properly, it will fall apart and you either won’t be able to see it under the scope. Or the wrong fixative will change the appearance of your sample and you will not see an accurate representation of the sample and your results will be false.
I first used a fixative called Glutaraldehyde because that’s what everyone was using as their fixative. However, I was having a problem for a month where my sample would crash in later steps. After tweaking one thing at a time, I found that the fixative I was using wasn’t right here, so I switched to something called Bouin’s fixative, which is rarely used in biology anymore, but it worked here. I just put the whole spider belly in there and let it sit for a long time.
3. The fixative worked so well that I was able to peel the spider web right off the abdomen and it left me with a small semi-hardened ball of fat and internal organs and other tissue. The next step was to get all the water out of the sample. I exposed the sample to increasing concentrations of alcohol over the course of a day starting in the morning with 10% alcohol and working up to higher and higher concentrations as the day progressed.
4. Now that the water was out, the sample was ready for the embedding steps. Electron microscopy uses a different embedding medium than light microscopy techniques. Electron microscopy used epoxy resin while all other embedding techniques typically use paraffin wax. However, every time I tried to use paraffin embedding, the sample dissolved. I believe there were 6 months and maybe 200 attempts at paraffin embedding and it never got right, so regardless of whether I was using the electron or light microscope, I always used epoxy embedding techniques.
5. Now that the sample is embedded, it is ready to be cut into sections. The sections are then placed on a slide for viewing below the scope. One of the things I love about electron microscopy is its “one stop shop” approach to research. In an electron microscopy lab, we build our tools. So to slice our samples, we make our knives. Our knives are glass knives made using a knife maker. The knives are sharp and precise enough to cut 1 um thick sections which is 1/1000 of a mm.
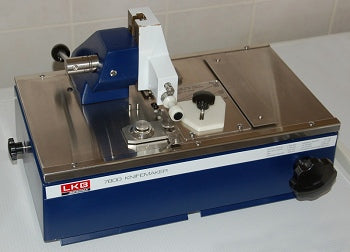
Knifemaker for making glass knives

Glass knives
Once the knife was made, I put it on the ultratome to slice the specimen.

6. Once the cuts were made, I would insert them to help visualize the parts. Specimens are usually very pale to almost clear, and the correct stain will help all cellular components become visible.
7. Now that the sections are stained I would place them on copper trays and they are ready for visualization.
8. While looking at the specimen under the electron microscope (TEM) if I saw something of evidentiary value, I would take a picture of it. The electron microscope is old school and we kept it that way because sometimes the first way of doing things is the best way. So when I took a picture, I mean I took a picture, on film. Because film has a higher resolution than digital. And then when I took my pictures, I developed them in the darkroom we had in the lab. When you do electron microscopy you do everything yourself.

Transmission electron microscope. When in use, we turned off all the lights in the room so we could see our samples under the green glow of the phosphor screen.
And this was my favorite result:

Now, what does this have to do with skin care? I would say, everything. One thing I’ve noticed is that skin care research is mostly for marketing purposes or it’s a dead end. And I believe the reason for the flawed results, the misleading results, and the bad results is bad methodology.
Skin care “researchers” are funded by cosmetic companies, so their results must please their customers. Therefore, these results are biased or false. Results are also rushed, which destroys data.
Electron microscope laboratories are the last vestige of a lost era of science. When you enter an electron microscope laboratory it is like stepping into the past. The equipment may be new, but it looks old, because the technology hasn’t changed in 70 years. You don’t have to, because it was right 70 years ago and nothing that has come out since has been better. It’s faster with less effort.
Electron microscopy techniques are slow, but they are important. And the best results I achieved in my research were doing things the old way, the way science was done. With artful techniques that may have taken forever (the above protocol would have taken weeks), but they gave a true and accurate depiction of the sample.
Future studies will use human skin samples exposed to various skin treatments and put under various conditions to gain an accurate understanding of how the skin behaves. I will explore the following:
1. Changes in skin water content from exposure to skin care containing hyaluronic acid
2. Changes in collagen levels from exposure to vitamin C serums
3. Changes in the skin’s extracellular matrix from exposure to daily exfoliation.
I have added electron microscopy equipment to my lab and will use the above methods to prepare my sample. I believe the results will be significant.