
You have probably seen Powerlifters Deadlifting or Squatting with chains dressed in their bars.
It looks and sounds bad – but it’s not just for demonstration.
Installation of chains (as well as bands) in Barbell is called upon to host resistance and can be a useful tool that will help you break up the lifting plateaus and hit new PRS.
As you lift a bar to which the chains are connected, the chains are gradually rising from the floor, increasing the load as the bar increases.
You can also get this variable resistance using elastic zones. You can attach one end of the band to Barbell and the other end on an anchor near the floor. At the bottom of the lift, the belts are relaxed, but as you raise the Barbell, the band extends and increases the intensity, making the bar feel heavier as you reach the top of the lift.
Back in my days, My coach, Matt ReynoldsBuilt -in chains and elevators with emotions in my programming quite a bit. I really liked it because they added a variety to my training and helped me overcome a few stuck points to the lifts that plague me for months.
To help us walk through the benefits of serving resistance and its integration into your planning, I went to the horn with Matt to get his ideas and advice.
A short history of resistance hosting
The idea of a variety of resistance through a range of movement of a lift was around the first days of training power. The early 20th century would use chains in their exercises to change the load during the lift. In the middle of the 20th century, the Soviet legend of Powerlifting Vasily alekseyev It would make its lifts in high medium water to add some resistance to its exercise.
It was not until the 1990s that resistance service became a popular tool among Powerlifters. And the man who had the greatest impact on spreading his use was his Louie Simmons Westside Barbell.
Simmons began connecting heavy chains to barbecue to accommodate the body’s changing leverage throughout the elevator. Later he began to use elastic zones with his lifts as an alternative way to provide resistance.
Why use the resistance
Here’s what the resistance resistance offers:
Fits your strength curve. The biggest reason you would use the resistance is that it makes the lift match your power curve: you are stronger on top of lifts such as squat and bench than you are at the bottom.
As you lift a resistor -equipped bar, the chains gradually rise from the floor or the belts stretch, increasing the load as the bar reaches higher and taller and getting the heavier on top of the movement. Thus, the elevator is lighter at the bottom, where you are weaker and heavier at the top, where you are stronger. “By increasing the resistance as you move to the strongest parts of your lift, you consume more muscle fibers, which helps with strength and hypertrophy,” Matt told me.
Increases the power and speed of the rod. “The compensatory acceleration of resistance forces,” says Matt. “You’re a bit in a match at the top. The bar becomes heavier as you lift it up, so it teaches you to push harder all the way.” This develops explosive power demanding a high rhythm of continuous power.
It goes beyond stuck points. At some point in your career, you will find that you have sticky points – places in the lift where you can’t seem to go further. For example, I had a period when I had trouble locking my bench. I started adding chains to the lift and because the bar became heavier as it moved, I was able to really train to pass through the lock. Once I took out the chains, the Barbell felt super light all over the lift.
As Matt explains, because the resistance service overloads the parts of a lift where you are strong and maintains weight where you are weak, you get “more speed that goes to the stuck point; you often get taller and in a better leverage before your sticky point.
Question your muscles in a different way. Serving resistance, especially in the form of bands, forces you to stabilize the rod. It also improves bars control and requires you to stay tight throughout the lift.
Chains vs. bands: advantages, disadvantages and better uses
There are two ways to add satisfaction resistance: chains and elastic zones. Everyone has its advantages and disadvantages:
Chains. The chains provide a resistance curve that depicts and loads more linear than the zones. As Matt explained, “they do not actively pull the bar, standard gravity applies.” This makes them easier to control even more forgiving. The chains are easy to adjust. Just hang a few chains from the bar. (I’ll show you how much below.) They are ideal for beginners and great to match the strength curve, while helping with the stuck points.
Zones. Zones offer more extreme variable resistance. “Bands increase the speed of gravity,” Matt said. “What I mean is if you leave the bar. It will fall faster than gravity only because the band actively pulls the bar down.” Bands also insert horizontal forces, so if your form is turned off, you will know. They will get the bar out of alignment, making them less forgiving but more effective for exposing weaknesses.
They are also more intense, which makes them better for advanced explosiveness lifters. The other rise of the bands is that they are cheaper and quieter than the chains. You can use bands in a public gym without causing a metal ruckus.
One of the disadvantages of the bands, I think, is that it is a kind of pain to settle. You need a squatting shelf that will allow you to use band clothespins. And you have to make sure you evenly place the bands in Barbell so that everything stays nice and smoothly during the lift and do not pull in different directions.
When to use chains or zones
Start with chains if you are young to host resistance. They are more forgiven and help you build confidence in your locking without compromise. Bands are better for experienced lifters who want to train explosives and work in the control and speed of bars.
“When you really try to get to quickly and explosives, bands are probably the best choice,” Matt noted. “But for hypertrophy and learning to go through the sticky points, the chains are awesome.”
How to plan with the satisfaction of resistance
Here is Matt’s guidance for programming:
- Use hosting resistance no more than once per lift per week.
- They favor chains if longevity is the goal. Complexes for short explosions of explosive training.
- Use belts for 4-6 weeks before leaving and break from them.
- Use chains for 6-8 weeks before leaving and break from them.
The reason for which there is a difference in the time you can train with chains against bands is that zones are more difficult in the body, while chains are easier.
Use resistance to satisfaction in your supplementary lifts
Matt thinks that one of the best ways to add resistance is to use it with your complementary lifts. So planned for me when I used it regularly.
A sample of Barbel training week with satisfaction resistance may look like this:
- Upper Day 1: Main Elevator – Bench. Supplementary Elevator – Chain Shoulder Type
- Bottom Day 1: Main Elevator – Squat? Supplementary Elevator – Deadlift Chain
- Upper day 2: Main elevator – shoulder type. Supplementary Elevator – Chain Bench Type
- Bottom Day 2: Main Elevator – Deadlift; Supplementary Elevator – Chain Chain
Set up your Barbell for chain and band work
To take full advantage of resistance service, adjustment issues. Here’s how to do it right:
Chains
I got my chains from Rogue Fitness. I got the 5/8 “chain kits, And comes with:
- (2) 15lb chain 5/8 “with carbiner. I will have two more lengths of 15 lbs of the 5/8 chain”, so you will have 30 kg of total chains to work.
- (2) 4 ‘1/4 chain lengths with carbiner. This is your leader to hang from your bar. Once you have this chain leader hanging from Barbell, you will hang the heaviest 15lb chain lengths in it.
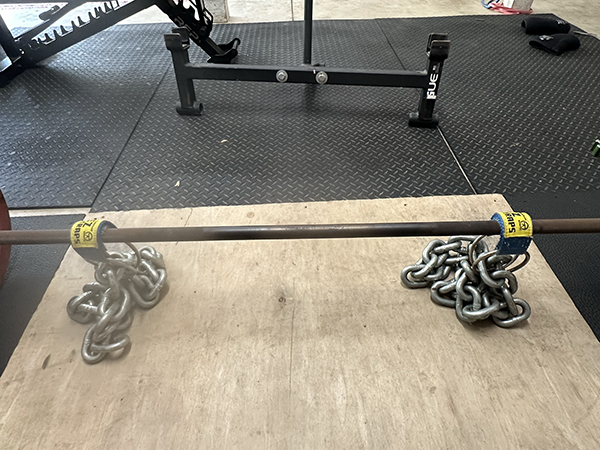
In addition to a chain set, take yourself some Straps ez. They make a breeze attacker for a dead end. More in it in a second.
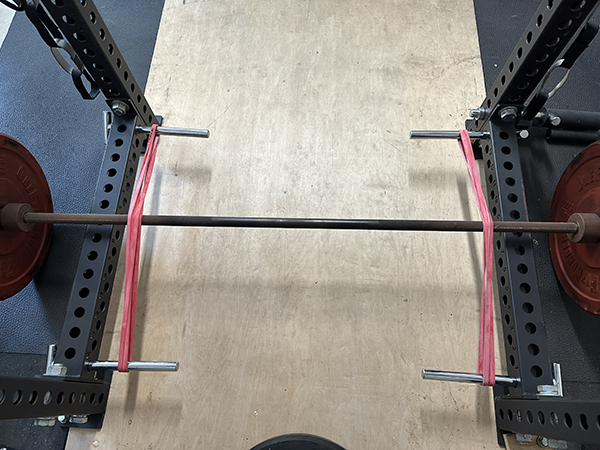
Secure chains in the bar
For bench, squat, or press, you are going to wet the small chain leader around the Barbell sleeve, as.
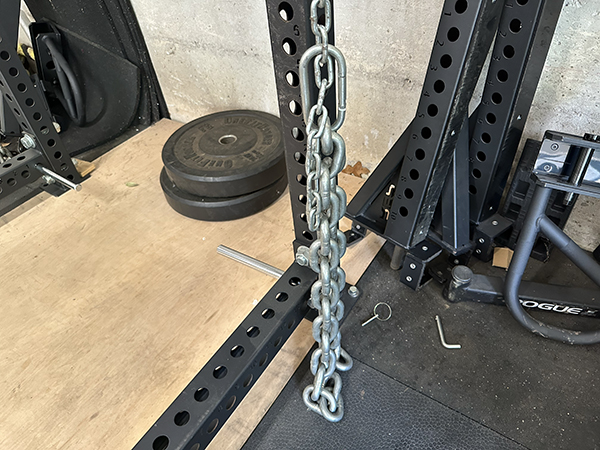
Then connect the large heavy chains in the leader chain with a carbiner. Connect the carbiner to the leader chain so that when you are on top of your lift, one or two chains of connections should still be on the floor.
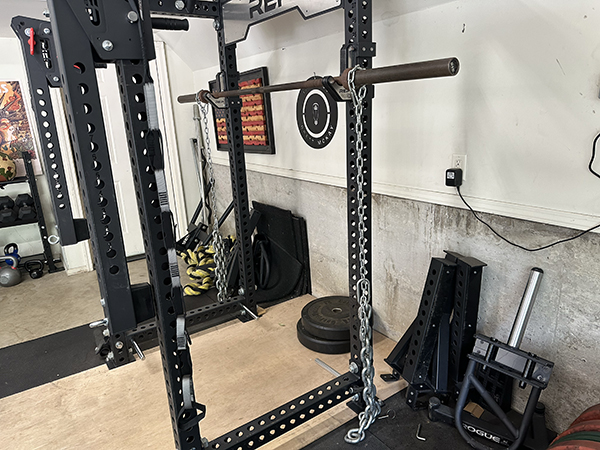
They should look like the above when everything is said and done.
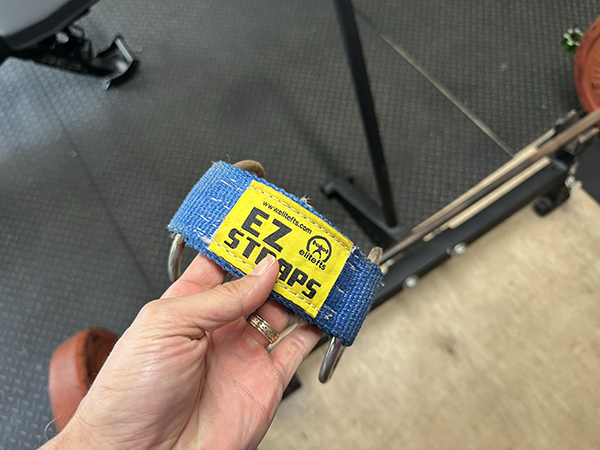
For Deadlift, simply place the EZ straps on the Deadlift bar and screw your chains through the rings.
Excellent!
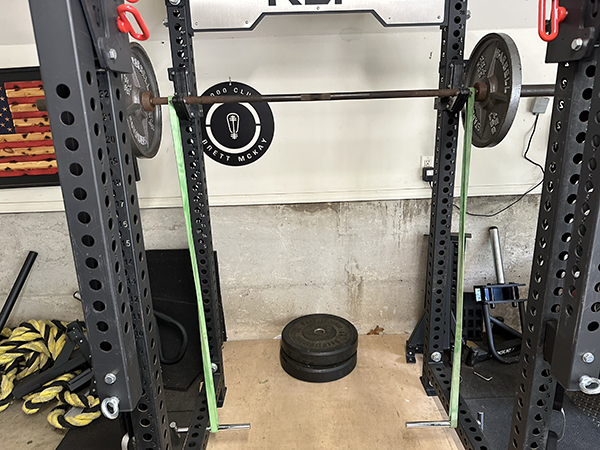
Bands
In my opinion, bands are a pain in the end to adjust. If you do not adjust them evenly on both sides, your lift will be screwed.
You too Use belts in weight machines If you are a machine type.
Lift
Anchor the bands to bandwages on your Squat shelf. You will need four clothespins as above. If you do not have bands of bands, you can dip them around heavy dumbbells, but the anchored bands are safer.
Start with light or medium zones. When you adjust your belts, the band should be slightly intensified, even at the bottom of the lift. This usually requires you to double the zones.
Squat
You will also need cloths for the occupation. Place the band’s goggles in the middle of the shelf where your midfoot would be when you unwind and walk back the weight.
Remember, the belts pull harder than gravity, so you need to stay tight and check during the reduction phase.
By incorporating the resistance, you can train more explosives, hire more muscle fibers and move on to your adhesive points.
And when you use chains, you will look like a bad one.
Try it and soon you can hit a new PR.