I’ve done the traditional barbell squat all my life. It is a great exercise for overall lower body strength. I’ve also experimented with other squat variations: the front squat, the goblet squat, the belt squat.
This year I did a squat that has become my favorite ever: the Hatfield squat.
I love this exercise. I originally switched to it because long-standing issues with tight shoulders and knee pain made the traditional barbell squat uncomfortable. The Hatfield squat made squatting fun and productive again after years of frustration trying to make the barbell squat work for me. What’s also great about the Hatfield Squat is that it’s a great quad hypertrophy move, which aligns with my new fitness goal of getting more ripped. It’s been a game changer in my training.
If you’ve been struggling with the barbell squat or are looking for a different squat variation to get into your programming, here’s everything you need to know about the Hatfield squat.
What is the Hatfield Squat and what are its benefits?
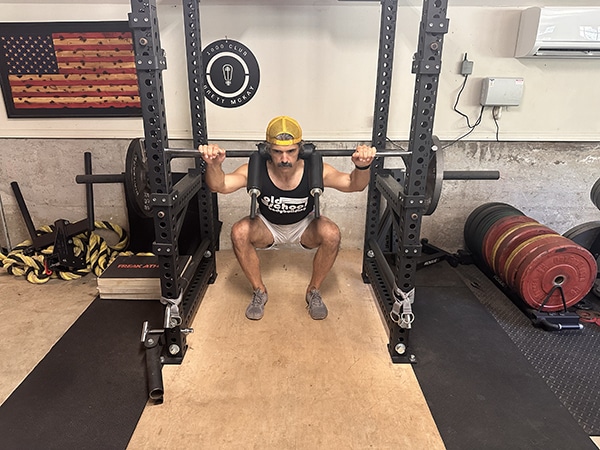
The Hatfield squat, named after the powerlifting legend Dr. Fred Hatfieldalso known as Dr. Squat, is a variation of the back squat that requires a squat safety bar, which is a type of bar that looks somewhat like an ox yoke.
When you do the Hatfield squat, you place the squat safety bar on your back. Then, instead of holding the safety bar with your hands, you rest your hands on an additional bar or a set of handles placed at belly level on the rack of the bar. As you lower into the squat, you keep your hands on the support in front of you, using it to maintain your balance and an upright torso.
This increases the stability of the exercise, allowing the Hatfield squat to provide some unique benefits:
Ideal for quad hypertrophy. If you want to grow legs as big as tree trunks, the Hatfield squat can be a useful tool. Its increased stability allows you to overload your quads more than a traditional squat. Instead of focusing on maintaining your balance during the squat, you can just focus on the movement, which means you can be a little more aggressive in adding reps or weight.
Great for squatting around injuries. The most important benefit the Hatfield squat has given me is that it has allowed me to squat heavy again despite severe physical problems I have had for years.
Because I have bench press shoulder tendinitis and struggle with shoulder flexibility (despite the time I’ve spent working on developing this ability), the bar position in the traditional low bar squat only made my shoulder pain worse. Because you use a safety bar with the Hatfield squat, you don’t need to use your hands to hold the bar against your back. It completely takes the stress off your shoulders.
The Hatfield squat has also allowed me to deal with the pain behind my knee since 2020. The pain only occurs during the descent of a traditional barbell squat. I still don’t know what the source of the pain is, despite talking to an orthopedist and having an MRI. I believe it’s some sort of overuse injury to a tendon back there. But in any case, the increased stability of the Hatfield squat allows me to squat heavy and below parallel without pain behind my knee.
People with lower back problems have also found the Hatfield squat useful for squatting without aggravating their injury.
Because of the pain-reducing ability of the Hatfield squat, I also call them “Midlife Man Squats.”
It is a great lifting accessory for the barbell squat. You don’t have to completely replace the traditional barbell squat with the Hatfield squat. Instead, you can use the Hatfield squat as an auxiliary lift in your barbell programming. On deadlift day, you could do the Hatfield squat for 3 sets of 8-12 reps for hypertrophy and increased work capacity.
Or you could use the Hatfield squat for overload training to build strength and confidence in lifting heavier weights by doing 3 sets of 3 reps with a weight that’s heavier than what you’d normally lift in the traditional barbell squat.
Here’s a hypothetical barbell program that would incorporate the Hatfield squat:
Lower Body Day A
- Squat 3 x 5 (the squat is the main lower body lift)
- Rack pulls 3 x 5 (rack pulls are the lifting accessory for the deadlift)
- Good morning 3 x 10
Lower Body Day B
- Deadlift 1 x 5 (deadlift is the main lower body lift)
- Hatfield squat 3 x 8-12 (Hatfield squat is the lifting accessory for the squat)
- Lunges 3 x 12
How to perform the Hatfield Squat
The Hatfield squat is fairly easy to perform. You just have to have the right setup.
Equipment Required:
- Squat Safety Bar (SSB)
- Bar or handles
Place the handles or bar on the squat rack at about belly height.
Get under the safety bar and peel it off.
Keep your hands lightly on the handles or bar in front of you. You are not using the handles/helper bar to help pull yourself up. You simply use them to maintain your stability throughout the lift.
Squat with an upright torso. The Hatfield squat should be done with an upright torso. You don’t have to bend over like you do in a low bar squat.
Lower yourself to just below parallel, then raise yourself back up. Remember, just use the handles for stability. Do not use the handles to pull yourself up.
As I said at the beginning, the Hatfield squat was a game changer for me. It allowed me to continue to squat without pain. If you have struggled to incorporate the barbell squat into your training due to pain, try the Hatfield squat. I think you’ll probably like it as much as I do.
