")
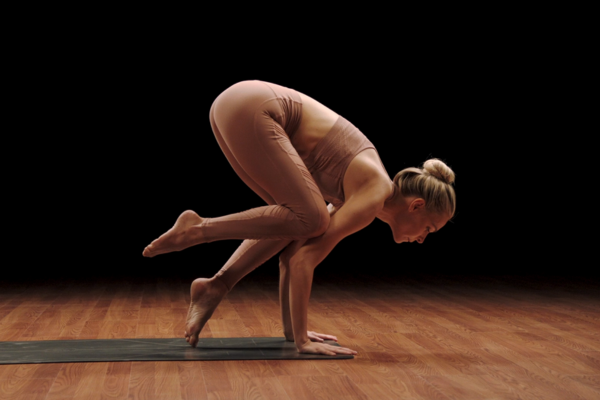
Yogis who want to foray into arm balances should try their hand at crow pose (Sanskrit name: kakasana). Often confused with crane pose (bakasana), the crow offers multiple approaches that make it accessible no matter where you are in your yoga practice.
When certain actions are emphasized—for example, engaging your core, tightening your inner thighs, or bending your spine (i.e., rounding your back)—it becomes clear that most yoga poses or asanas mold our bodies into repetitive shapes. they just have different relationships to gravity.
When you approach crow pose with playfulness (and humility), this low-to-the-ground hand balance is a lot of fun. Here’s how to do it.
Crow Pose (Kakasana): Step-by-step instructions
- Start on your mat inside malasana (or yogi squat): stand with your feet hip-width apart and lower your body into a full squat, making room for your chest by spreading your knees. (If you can’t bring your feet together, spread them apart.)
- Reaching your hands between your knees, place your hands on the floor in front of you, elbows bent and knees over your triceps. Your hands should be shoulder-width apart, with your fingers spread apart.
- Come up onto the balls of your feet and lean forward, keeping your heels as close to your tailbone as possible throughout the stance.
- Maintaining a bend in your elbows and keeping your gaze straight ahead of your hands, shift your weight forward as you press your feet into your hands like a clamp, engaging your core muscles and rounding your back.
- Pull your kneecaps as high as possible into your arms before lifting your feet off the floor. Try to keep the insides of your feet pressed together.
- Lean forward, lifting your hips as high as possible. Your pelvis should be higher than your shoulders in the fullest expression of the pose.
- Hold for up to one minute, breathing slowly and deeply. Slowly reverse the movement to return to the starting position.
Beginner tips for doing crow pose
- One of the ultimate goals of this pose is to bring your kneecaps into your armpits, but if that’s too difficult, a good way to start is to place your shins over your arms.
- Your back should be so rounded in crow that it resembles the shape of cat pose in cat-cow row. “I definitely recommend deep abdominal engagement, which will create a bend in the lumbar spine,” says Brent Laffoon, instructor in BODi’s Yoga52 practice series. When your lumbar spine is rounded and you feel a strong lift from your navel, your weight naturally begins to shift forward and your feet swing off the floor.
- Without losing the bend in your spine, add the opposite movement by spreading your collarbones, creating width throughout your chest.
- Eventually, as you become more confident supporting your weight on your wrists, you can tighten the shape by pressing your feet higher into the tops of your hands. This creates lift, allowing your legs to come together. “Ideally the big toes touch the crow’s feet,” advises Laffoon. “It’s not the end of the world if they don’t, but bringing them together activates the hips in a way that can help lift.”
How to make crow pose easier
- Play with the weight shift to get a feel for the pose. You can stack the tops of your shins, one at a time, higher up your hands toward your armpits. Then try to lift one leg, putting it down, then the other and putting it down, as you grade into the actual stance.
- Another way to work your way up to the pose is to start by standing on a block. The lift provided by the block will give you more room to squeeze your knees higher into your hands.
How to make crow pose more difficult
- Once you feel confident in crow pose, try placing the top of your head on the floor, forming a head tripod.
- There are endless possibilities with crow. From here, you can move on to more challenging hand balances or use it as a transition pose.
Crow Pose Vs. Crane Pose: What’s the Difference?
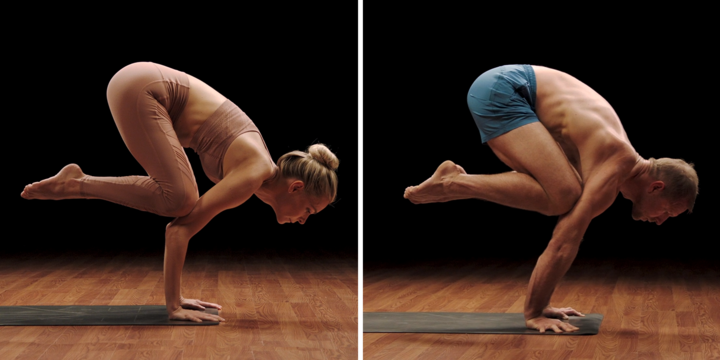
The main difference between crow pose and crane pose is the angle of the elbow. In crow pose, the elbows are bent and the forearms are vertical, usually with the feet resting on the upper arms. In crane stance, arms are straight (or as close as possible), forearms angled forward, with kneecaps tucked into armpits.
Once you’re comfortable in crow pose, you can play with straightening your arms and moving your knees more towards your armpits until you achieve a crane. From there, you can start working towards going hands-on.
Benefits of Crow Pose (and Crane Pose)
Yoga as a practice is attended by a many benefits backed by science, but there are several that are specific to the crow pose:
- Strengthens arms and shoulders
- Balance of trains
- Promotes core strength and stability